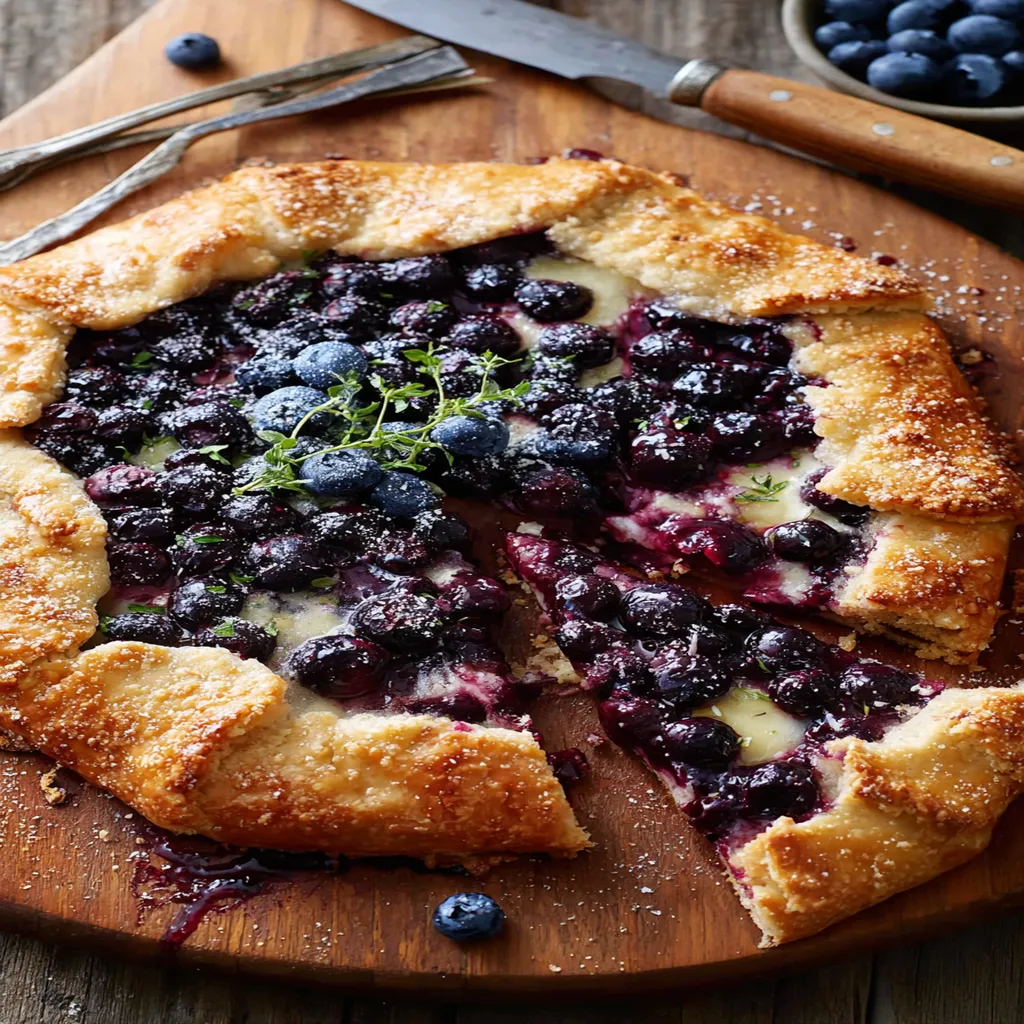
Authentic Blueberry Cheesecake Galette Recipe: 13 Savory Variations
Hey there, friends! I’m beyond excited to chat with you about one of my all-time favorite desserts, the Blueberry Cheesecake Galette. I stumbled upon this beauty a few summers back when I had a surplus of fresh blueberries from a local farm stand, and let me tell you, it was love at first bite.
My family couldn’t get enough of this rustic, creamy, fruity masterpiece, and I’ve been tweaking the recipe ever since to get it just right.
Honestly, there’s something so satisfying about whipping up a Blueberry Cheesecake Galette. It’s like the laid-back cousin of a traditional cheesecake, with all the flavor but half the fuss. I’ve got vivid memories of my first attempt (a bit of a soggy mess, oops!), but now it’s a go-to in my kitchen for any occasion.
So, grab a cup of coffee, and let’s dive into why this Blueberry Cheesecake Galette is gonna become your new dessert obsession. I’m spilling all my tips and tricks to help you nail it on the first try!
Why You’ll Love This Recipe
I’ve found that the Blueberry Cheesecake Galette is a total crowd-pleaser, and trust me, I’ve served it at countless get-togethers. It’s got this perfect balance of tangy cheesecake filling and sweet, juicy blueberries, all wrapped in a flaky, buttery crust that just melts in your mouth. Plus, it looks super fancy without requiring pro-level baking skills—score!
In my kitchen, this recipe is a lifesaver when I want something impressive but don’t have hours to spend. The rustic vibe of a galette means you don’t need to stress over perfect edges or fussy decorations. I’m tellin’ ya, if you’ve got a hankering for something sweet and simple, this Blueberry Cheesecake Galette will steal your heart.
Ingredients List
Alright, let’s talk ingredients for making a stellar Blueberry Cheesecake Galette. I’m pretty picky about what I use because quality really shines through in a dessert this simple. Here’s everything you’ll need, with a few of my personal faves thrown in for good measure.
For the Crust
- 1 1/2 cups (190g) all-purpose flour, sifted for a lighter texture
- 1/2 cup (115g) unsalted butter, cold and cut into small cubes (I prefer European-style for extra flakiness)
- 1 tablespoon (12g) granulated sugar, for a touch of sweetness
- 1/2 teaspoon salt, to balance the flavors
- 4-6 tablespoons ice water, added gradually to get the right dough consistency
For the Cheesecake Filling
- 8 oz (225g) cream cheese, softened to room temperature (I usually buy full-fat for richness)
- 1/4 cup (50g) granulated sugar, for sweetness
- 1 large egg, room temp for smoother mixing
- 1 teaspoon vanilla extract, pure for the best flavor
- 1 tablespoon (15ml) lemon juice, for a zesty kick
For the Blueberry Topping
- 2 cups (300g) fresh blueberries, washed and patted dry (frozen works too, but I love fresh when in season)
- 2 tablespoons (25g) granulated sugar, to enhance the fruit’s natural sweetness
- 1 tablespoon (8g) cornstarch, to thicken the juices
- 1 teaspoon lemon zest, for a bright pop of citrus
I’ve gotta say, sourcing fresh blueberries makes a world of difference in a Blueberry Cheesecake Galette. If you can hit up a farmers’ market, do it! And don’t skimp on the butter for the crust—it’s the secret to that “melt-in-your-mouth” magic.
Variations
One thing I adore about a Blueberry Cheesecake Galette is how easy it is to switch things up. Over the years, I’ve played around with different flavors and add-ins, and I’m pumped to share some of my go-to twists. Whether you’re catering to picky eaters or just wanna experiment, these variations on the Blueberry Cheesecake Galette will keep things fresh.
- Mixed Berry Blast: Toss in raspberries and blackberries with the blueberries for a colorful, tangy spin. I tried this once for a Fourth of July party, and the red, white, and blue vibe was a hit!
- Peach Combo: Swap half the blueberries for sliced fresh peaches. It’s a summery twist I’m obsessed with when peaches are in season.
- Chocolate Drizzle: After baking, drizzle melted dark chocolate over your Blueberry Cheesecake Galette for a decadent touch. My kids beg for this version every time!
- Almond Crunch: Sprinkle sliced almonds over the filling before baking for a nutty texture. I stumbled on this by accident and loved the added bite.
- Spiced Up: Add a pinch of cinnamon and nutmeg to the blueberry mix for a cozy, fall-inspired flavor. Perfect for cooler weather, in my opinion.
- Lemon Lover’s: Double the lemon zest and juice in the filling for an extra citrusy punch. I did this for a brunch once, and my friends couldn’t stop raving.
- Honey Glaze: Brush the crust with a bit of honey before baking for a golden, sweet finish. My husband swears this takes the Blueberry Cheesecake Galette to the next level.
Honestly, playing with these variations keeps the recipe exciting in my kitchen. Which one are you gonna try first? I’m curious! Another great option is category.
Servings and Timing
Let’s break down the nitty-gritty of servings and timing for this Blueberry Cheesecake Galette. In my experience, this recipe is pretty straightforward, but it does require a little patience for chilling and baking. Here’s what you can expect when you whip up your own Blueberry Cheesecake Galette. If you love this recipe, you’ll also enjoy mini no bake blueberry cheesecake.
- Prep Time: 25 minutes
- Cook Time: 35-40 minutes
- Total Time: About 1 hour 5 minutes, plus chilling time for the dough
- Servings: 6-8 slices, depending on how generous you’re feeling
I usually plan ahead for the dough to chill, but if I’m in a pinch, I’ve popped it in the freezer for a quick cool-down. It’s all about making this Blueberry Cheesecake Galette work for your schedule!
Step-by-Step Instructions
Alright, let’s get into the fun part—making this Blueberry Cheesecake Galette from scratch! I’ve broken it down into easy steps, with a few of my personal hacks to make things smoother. Trust me, I’ve baked this tons of times, so I’ve got ya covered. For more recipes like this, check out category.

Step 1: Make the Crust
Start by mixing the flour, sugar, and salt in a big bowl. Cut in the cold butter with a pastry cutter (or your fingers, if you’re old-school like me) until it looks like coarse crumbs. Add ice water, a tablespoon at a time, until the dough just holds together—don’t overdo it!
Step 2: Chill the Dough
Wrap that dough in plastic wrap and pop it in the fridge for at least an hour. I’ve learned the hard way that skipping this step leads to a sticky mess. Chilling makes rolling it out for your Blueberry Cheesecake Galette so much easier.
Step 3: Prep the Cheesecake Filling
While the dough chills, beat the cream cheese, sugar, egg, vanilla, and lemon juice until smooth. I use a hand mixer for speed, but a good ol’ whisk works too. This filling is the creamy heart of the Blueberry Cheesecake Galette, so make it nice and fluffy!
Step 4: Mix the Blueberry Topping
Toss the blueberries with sugar, cornstarch, and lemon zest in a separate bowl. I like to do this right before assembling so the berries don’t get too juicy. It’s a little trick I’ve picked up to keep the Blueberry Cheesecake Galette from getting soggy.
Step 5: Assemble and Bake
Roll out the dough on a floured surface into a rough 12-inch circle, then transfer it to a parchment-lined baking sheet. Spread the cheesecake filling in the center, leaving a 2-inch border, and pile the blueberries on top.
Fold the edges over, rustic-style, and bake at 375°F (190°C) for 35-40 minutes until golden. I always peek halfway to make sure my Blueberry Cheesecake Galette isn’t browning too fast!
Step 6: Cool and Serve
Let it cool for at least 20 minutes before slicing—trust me, it’s worth the wait to let those flavors settle. I’ve burned my tongue rushing this step more than once (ugh!). Your Blueberry Cheesecake Galette is ready to wow everyone at the table.
Nutritional Information
I’m no dietitian, but I think it’s helpful to know what’s in this Blueberry Cheesecake Galette, especially if you’re keeping an eye on portions. Here’s the breakdown per slice (based on 8 servings), and honestly, I don’t stress too much over indulging in this treat. A little Blueberry Cheesecake Galette now and then never hurt anybody!
- Calories: 340 per serving
- Fat: 20g
- Protein: 5g
- Carbohydrates: 36g
- Sodium: 210mg
Healthier Alternatives
My friend at blueberry muffins with sour cream has a similar recipe that you might enjoy.
If you’re looking to lighten up your Blueberry Cheesecake Galette, I’ve got some swaps I’ve tried that still keep it delicious. I’m all for balance, so when I’m watching my intake, these tweaks come in handy. Here are a few ideas to make your Blueberry Cheesecake Galette a bit guilt-free without sacrificing flavor.
- Lower-Fat Cheese: Use reduced-fat cream cheese for the filling. I’ve done this, and while it’s not quite as rich, it’s still super tasty.
- Sugar Substitute: Swap granulated sugar for a natural sweetener like honey or maple syrup in both the filling and topping. I think it adds a unique depth to the Blueberry Cheesecake Galette.
- Whole Wheat Crust: Replace half the all-purpose flour with whole wheat flour for added fiber. It’s a bit denser, but I kinda like the nutty vibe it brings.
Serving Suggestions
I love getting creative with how I serve a Blueberry Cheesecake Galette because it’s so versatile. Whether it’s a casual brunch or a fancy dinner, I’ve got some ideas that’ll make it shine. Here are my favorite ways to present this Blueberry Cheesecake Galette at the table.
- For Dessert: Add a scoop of vanilla ice cream on the side. It’s my absolute go-to for that hot-and-cold contrast!
- Brunch Star: Pair it with a dollop of whipped cream and a dusting of powdered sugar. I did this for a family brunch, and it felt so elegant.
- Coffee Break: Serve a small slice with a strong cup of espresso. It’s my afternoon pick-me-up with a Blueberry Cheesecake Galette twist.
- Party Platter: Cut into smaller wedges for a dessert buffet. My friends loved grabbing bites at my last gathering!
Common Mistakes to Avoid
I’ve made my fair share of oopsies while perfecting this Blueberry Cheesecake Galette, so let me save you some headaches. Trust me on this one, avoiding these pitfalls will make your baking experience way smoother. Here’s what to watch out for when crafting your Blueberry Cheesecake Galette.
- Overworking the Dough: I learned the hard way that too much kneading makes a tough crust. Mix just until it comes together!
- Soggy Bottom: Don’t skip the cornstarch in the blueberry mix—it absorbs juices. My first Blueberry Cheesecake Galette was a wet disaster without it.
- Baking Too Soon: If the dough isn’t chilled, it’ll be a nightmare to roll. Been there, done that, and it ain’t pretty.
- Overfilling: Too much filling can leak out and burn. I’ve had to scrub my oven after overloading, so keep it modest.
Storing Tips
If you love this recipe, you’ll also enjoy blueberry sauce recipe.
Got leftovers of your Blueberry Cheesecake Galette? No worries—I’ve figured out the best ways to keep it tasting fresh. In my experience, proper storage is key to enjoying this treat for days.
- Refrigerator: Store in an airtight container for up to 3-4 days. I’ve found it still tastes amazing with a quick reheat.
- Freezer: Wrap individual slices in plastic wrap and freeze for up to 2 months. I’ve thawed a Blueberry Cheesecake Galette slice for a late-night craving, and it’s a game-changer!
- Reheating: Warm in the oven at 300°F (150°C) for 10 minutes to revive that flaky crust.

Frequently Asked Questions
I get a ton of questions about making a Blueberry Cheesecake Galette, so I’ve rounded up the most common ones. Let’s tackle ‘em with some real-talk answers based on my baking adventures.
Can I use frozen blueberries?
Absolutely! I’ve used frozen blueberries plenty of times for a Blueberry Cheesecake Galette, especially in winter. Just don’t thaw them first—toss ‘em in straight from the freezer to avoid extra juice.
Do I need a pie dish for this?
Nope, that’s the beauty of a galette! You just shape it freeform on a baking sheet. I’ve never used a dish for my Blueberry Cheesecake Galette, and it always turns out fine. For another great variation, check out sour cherry cheesecake from scratch recipe.
Can I make the dough ahead?
Yes, and I often do! Make the dough up to two days in advance and keep it refrigerated. It’s a time-saver when I’m prepping a Blueberry Cheesecake Galette for guests.
What if my crust cracks?
Don’t sweat it—mine cracks sometimes too. Just patch it with extra dough or press it together. Rustic is the name of the game with this dessert.
Can I skip chilling the dough?
I wouldn’t recommend it. Chilling helps the butter stay solid for a flaky crust. I’ve skipped it before, and the results weren’t pretty.
Is this recipe kid-friendly?
Totally! My kiddos love helping with the folding and berry tossing. It’s a fun family project in my house.
Can I use a store-bought crust?
For another great variation, check out instant pot lemon blueberry cheesecake.
Sure, if you’re short on time. I’ve used pre-made pie dough in a pinch, and while it’s not as buttery, it still works great.
How do I know when it’s done?
Look for a golden-brown crust and bubbly filling, usually after 35-40 minutes. I always give my galette a quick check around the 30-minute mark to be safe.
Conclusion
Well, folks, I hope you’re as pumped as I am to try this Blueberry Cheesecake Galette! It’s truly one of those recipes that brings smiles to the table, and I can’t wait for you to experience that magic. Whether it’s your first galette or your hundredth, I’m rooting for ya to nail this Blueberry Cheesecake Galette with all the tips I’ve shared. Drop a comment if you give it a whirl—I’d love to hear how it turns out!